Showing posts with label recipe. Show all posts

Monday, April 30, 2012

Chicken Spaghetti

So I have had lots of requests on Instagram to blog about this so here it goes.  I wish I would have taken a picture of each step but I forgot to! Sorry ladies! I did get this off of Pinterest but added the cream of mushroom soup to mine. 


Ingredients
boneless skinless chicken breasts (I used boneless skinless chicken tenderloins and cut in chunks)
1 can cream of mushroom
1 can cream of chicken
1 can of Rotel Red Diced Tomatoes with Green Chiles
8 oz of Velvetta cut in chunks
Onion powder
Garlic Powder
1 tbsp margarine
8 oz of spaghetti noodles ( I think I used 16 oz)
Shredded cheese is optinoal
Heat oven to 350*

Melt butter in skillet.  Add chunks of chicken, onion powder and garlic powder.  I estimated on the amount of both seasonings.  Make sure the chicken is cooked all the way through with no pink! 
*I would cook spaghetti noodles as your cooking the chicken*

When chicken is cooked, add soups, Rotel, and chunks of Velvetta.  Heat on low until melted.  When noodles are finished cooking, drain but do not rinse. Put back into pot.  Add chicken mixture to noodles.

Stir together.  Place chicken spaghetti into a 9x13 pan.  I sprinkled mine with shredded cheddar cheese.  Bake until cheese is melted and bubbly.  Mine took 15 minutes.

Tuesday, April 24, 2012

Pizza Biscuits


These are absolutely amazing!!  I can't take full credit for them.  My sister n law Autumn came up with the idea way before Pinterest came about.  These are super easy and the kids would have fun making them too!

Ingredients
- cans biscuits (the flaky kind do not work)
1 jar pizza sauce
-1 pkg. mozzarella cheese
- toppings of choice ( I used Canadian bacon and pepperoni)
-muffin/cupcake pan (2 would work great) 
-baking sheet


Step 1:  Turn muffin tin over so the holes are on bottom. Preheat oven to desired temperature on biscuit can. Pull biscuits apart and flatten them with hand.


Step 2:  Place flattened biscuit on top of the muffin tin.  I sometimes have to shape them to the tin.


Here is what they all look like on there. This is a can and a half of biscuits.


Step 3:  Place biscuits in oven for half of the time the can says.  My can said to bake 10-14 minutes so I put my biscuits in for 5.


Step 4:  While the pizza biscuit "bowls" are baking, chop and cut up ingredients for inside of pizza biscuits.


Here is what they will look like when they have baked for half of the time. Sorry so blurry!


Step 5:  Take biscuit "bowls" off the muffin tan and place on baking sheet. 


Step 6:  Scoop a spoonful of pizza sauce in bottom of biscuit. (while doing this you need to be baking your other biscuits "bowls" if you haven't done so already.


Step 7:  Place desired ingredients in next. I used pepperoni and Canadian bacon.


Step 8:  Add another layer of pizza sauce.  


Step 9:  Top with cheese.


Step 10:  Bake for the rest of the time or until cheese is melted.  I did mine for 5 minutes. 


*I have also made these for breakfast using scrambled eggs instead of pizza sauce, sausage, bacon, green peppers, and topped with cheddar cheese!  So delicious!! ENJOY!

Friday, April 20, 2012

Awesome chili!


Here is a recipe for some super amazing chili!

Ingredients

3-4 lbs of hamburger depending on how meaty you like your chili
5 jalapenos (take out the seeds)
1/2 of an onion chopped
3/4 Catalina Salad dressing
3/4 Otts Famous Dressing
2-3 tbsp chili powder
2 can chili beans (we use Bush's)
1 can kidney beans (also use bushes)
1 jar of tomato sauce (this is used to liquify your chili because it is pretty thick)

Chop up your onion and your jalapenos (don't forget to take the seeds out of the jalapenos).  Put them in a large pot with the hamburger and brown the meat.  Drain grease.  Add dressings, beans, and chili powder.  Add the tomato sauce at your discrepancy.  We used the whole jar because our chili turned out pretty chick. Let simmer for 30 min.  Serve!!

Wednesday, April 4, 2012

Megan's Recipe Binder

Good Wednesday Morning!!!!! Here we go again.  More binders!
So some of your kitchen drawers or cabinents probably looked the same as mine.  You know--someone gives you a recipe on paper or you print it off the computer and you have no where to put it but shove it in a drawer or if you were like me I folded it and put it in my recipe cabinent.  I had tons and tons of printed off recipes and recipes that people had given me and it was driving me nuts.  So I found on pinterest (imagine that) a recipe binder that I knew was just calling my name for me to make!


What you will need :
a 3-ring binder-I used 1 1/2 inches but I think I will be upgrading soon
dividers ( I used Avery)
clear plastic sleeves
cute paper (I got my super cute paisley paper from Office Max)
construction paper--optional


I started by making my tabs off the computer.  On www.avery.com you can pick the labels that you bought and it will give you a template to upload in a word document so your labels are just right!


In this picture its hard to see my labels on the tabels but they are there.  You can kind of see the word breakfast on the top tab.  Here are the tabs I used:
*Breakfast
*Appetizers
*Sides
*Soups/Salads
*Poultry Entrees
*Beef/Pork Entrees
*Crockpot
*Desserts
*Beverages

You are probably wondering where the fish/deer meat receipes are.  That's my husbands area of expertise and he just gos with the flow when it comes to cooking deer and fish.

I then started putting all my recipes into the clear plastic sleeves.  Some of them I had to retype because they were written in pencil and were starting to fad. 

On some of the recipes that weren't a full sheet I cut them down in size and was able to put more than one recipe in a clear plastic sleeve.  I used construction paper and tape to make it pretty.


After filling my plastic sleeves with recipes I then got my cute paper out.  I tested a piece of white paper in the printer first so I knew which way it would print out so I wasn't wasting any.  I then typed up all my sections in Word and printed them out. 


Saturday, March 31, 2012

Crockpot Chicken Fajitas

DJ absolutely loves chicken fajitas so I searched and searched Pinterest for a chicken fajitas recipe.  Here is what I came up with:  Crockpot Chicken Fajitas! via Pinterest

Ingredients:
chicken breasts or chicken tenderloins (I used both because I ran out of breasts)
peppers (I used, red, yellow, and green)
onion
lemon juice (recipe calls for lime but all I had was lemon)
chili powder
cumin powder
salt
1/2 chicken broth
*tortillas, cheese, sour cream, guacamole, hot sauce, salsa*


Not pictured are the peppers and onion


Cut up peppers and onions into strips and place in bottom of crockpot.


I will not do this step next time.  Next time I will only put the chicken in the crockpot with the seasonings and broth because we didn't like how soggy the peppers and onions became.  I will saute the peppers and onions right before we are ready to eat the fajitas.

After you have cut up the peppers and onions, place chicken breasts or tenderloins on top of peppers and onions.


Pour 1/2 cup broth on top of chicken.  I didn't measure the cumin powder, chili powder, or salt.  I just eyeballed it.  I know not a good cooking trait to have but that's what I do.  Sprinkle the seasonings and salt on top of the chicken.  Then squirt a little lemon juice on top of the chicken.  It should then look like this.


Cook on low for 8 hours.  When finished cooking I took out the chicken breasts and shredded them in a separate bowl.  I then ladled some of the juice from the crockpot onto the chicken.  My intentions were to shred the chicken and then place it back in the crockpot with the peppers and onions but it was very liquidy so I decided against that.

Serve with tortillas, cheese, sour cream, guacamole, salsa, hot sauce or whatever kinds of toppings you want!

ENJOY!

Wednesday, March 7, 2012

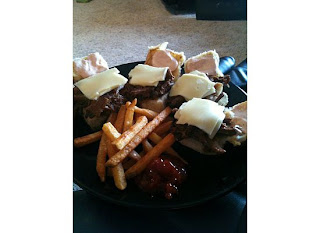
3 Envelope Crock Pot Sliders

I was very adament about making these 3 Envelope Crock Pot Sliders.  The ingredients did not look good together.  I think it was the salsa that was throwing me off.  I found this recipe on Pinterest. 


Slow Cooker Three Envelope Pot Roast Sliders Recipe:
(Recipe adapted from Plain Chicken)

Roast:
1 3-4 lb beef roast
1 cup water
1 cup salsa
1 envelope onion soup mix
1 envelope Italian dressing mix
1 envelope Au Jus mix

Whisk together water, salsa and seasoning packets. Place roast in slow cooker. Pour seasoning mixture over roast. Cook on low for 8-10 hours, or high for 4-5 hours.

If you want to make sliders:
Three Envelope Pot Roast recipe (above), shredded
1 pkg. King's Hawaiian Rolls
Sliced Swiss cheese (1 slice per slider)     * My hsuband used Horseradish Cheese (Yuck)
Creamy Chipotle Sauce (recipe below)

I did not do this next part!
Cut each roll in half and place on a baking sheet. Place a slice of Swiss cheese on the bottom half of each roll. Place baking sheet in oven with broiler on low. Broil for 1-2 minutes or until edges of the rolls are golden and cheese has melted (be sure to watch them closely so they don't burn!). Remove baking sheet from oven.
I was putting fries in the oven so didn't want to use the broiler. Instead I buttered both sides of the Kings Hawaiian Rolls.  I then placed them on the griddle to brown.  While doing this I pulled the beef out of Crock Pot and shredded it in a seperate bowl.  I then put it back in the Crock Pot to soak up some of the juices.  Had I known I was going to put the meat back in I would have just shredded the meat in the Crock Pot. 

Place a spoonful of shredded beef on top of each roll with Swiss cheese on it.  I then melted it in the microwave since I didn't use the broiler.  Spread Creamy Chipotle sauce on the top half of each roll. Assemble each slider by placing the top half of the roll on top of the bottom.

Creamy Chipotle Sauce:
1/4 cup sour cream (I used fat free)
2 Tbsp chili sauce
2 tsp creamy horseradish sauce (I used Kraft)

Sunday, March 4, 2012

Crock Pot Chicken Pot Pie

I absolutely love to use my slow cooker-crock pot whatever you want to call it.  I love the feeling that when you come home from work your food is already done.  Or like today I put our dinner in there this morning and was able to have our lazy Sunday with my sick baby boy.  Today/tonight I made Chicken and Dumplings.  Well that's what the recipe was called but I think of it more as a Slow Cooker Chicken Pot Pie. 

Ingredients:  5 frozen boneless skinless chicken breasts cut into chunks
                     2 cans cream of chicken soup
                     1 can diced potatoes
                     1 bag frozen veggies(used Birds Eye brand-carrots, peas, green beans, & corn mixtures)
                     2 slices Velveeta-who knows if 2 slices even adds any flavor but that's how I made it :)
                     A little Season All
                     2 tbsp butter
                     2 cans cheap biscuits

Directions:  Put the first 7 ingredients in the crock pot.  I also add a can of water to make sure the chicken mixture is covered.  Cook on low 5-7 hours. 
Just put all ingredients into Crock Pot.


30 minutes before serving, tear apart raw biscuits and place on top of chicken mixture.  Place lid back on and cook until biscuits are done.  They will still have sort of a soggy look to them but they are finished.  Sometimes I even poke my finger in the middle of one to make sure its done. :) 
Biscuits torn apart on top--have not cooked them yet.
Finished product!
The husband isn't a fan of soggy biscuits so I also cook him some extra biscuits in the oven for him to eat with this delicious meal.

This recipe is so good, quick and easy!  My whole family loves it.

LinkWithin

Related Posts Plugin for WordPress, Blogger...