Saturday, March 31, 2012

Crockpot Chicken Fajitas

DJ absolutely loves chicken fajitas so I searched and searched Pinterest for a chicken fajitas recipe.  Here is what I came up with:  Crockpot Chicken Fajitas! via Pinterest

Ingredients:
chicken breasts or chicken tenderloins (I used both because I ran out of breasts)
peppers (I used, red, yellow, and green)
onion
lemon juice (recipe calls for lime but all I had was lemon)
chili powder
cumin powder
salt
1/2 chicken broth
*tortillas, cheese, sour cream, guacamole, hot sauce, salsa*


Not pictured are the peppers and onion


Cut up peppers and onions into strips and place in bottom of crockpot.


I will not do this step next time.  Next time I will only put the chicken in the crockpot with the seasonings and broth because we didn't like how soggy the peppers and onions became.  I will saute the peppers and onions right before we are ready to eat the fajitas.

After you have cut up the peppers and onions, place chicken breasts or tenderloins on top of peppers and onions.


Pour 1/2 cup broth on top of chicken.  I didn't measure the cumin powder, chili powder, or salt.  I just eyeballed it.  I know not a good cooking trait to have but that's what I do.  Sprinkle the seasonings and salt on top of the chicken.  Then squirt a little lemon juice on top of the chicken.  It should then look like this.


Cook on low for 8 hours.  When finished cooking I took out the chicken breasts and shredded them in a separate bowl.  I then ladled some of the juice from the crockpot onto the chicken.  My intentions were to shred the chicken and then place it back in the crockpot with the peppers and onions but it was very liquidy so I decided against that.

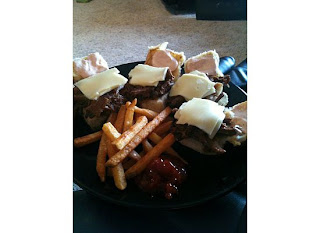
Serve with tortillas, cheese, sour cream, guacamole, salsa, hot sauce or whatever kinds of toppings you want!

ENJOY!

Wednesday, March 28, 2012

Kris' Baked Beans

So I'm sure everyone likes baked beans right?  Sometimes its just easier to open a can, throw it on the stove, and call it a side.  They are so easy to take to BBQ's too.  Well here is an easy recipe for some really amazing baked beans that are always at hit at our house!


Ingredients

2 cans baked beans of choice (I like Bush's Original)
1 tsp Ground Mustard
1/2 cup Ketchup
1/2-3/4 cup Brown Sugar
4 slices of raw bacon
9x13 dish


Place beans in bottom of dish, sprinkle ground mustard, ketchup, and brown sugar over beans.  Stir until well mixed.  Taste.  If its not sweet enough add brown sugar.  After making these beans several times I don't measure anything out anymore.  I base it strictly on taste.  When you have the desired taste place 4 pieces of bacon on top of beans.  Bake for 45 min at 350*.  The beans will start to simmer around the edge. 


Don't let the picture fool you.  These beans are truly amazing!
Recipe by my aunt Kris!

Classroom Organization

I LOVE ORGANIZATION!  I can't get enough organization in my life, although sometimes it makes my head spin.  It's just who I am.  Those of you that know me know I have OCD tendencies and love being organized, making labels, labeling things etc.  Not only is my house organized but so is my classroom. 

I have been teaching now for 4 years and created these weekly drawers for my planning.  I get a lot of my students work off the computer because being a Special Education we don't have many resources such as Reading books, math books, etc.  All my students are on individualized plans so getting all of their printables off the internet makes it easier for me.......so back to 4 years ago, I created this weekly drawer for when I am doing my weekly lesson plans.  I do day by day and when I print something off or need to use a specific workbook I just slide it right in the bin so I don't have to go searching for it the day of! Makes my life so much easier when I get to work in the mornings.  No I didn't get this off of Pinterest.....this was so 4 years ago "pre-pinterest"  haha!


Also at the beginning of the year I buy packages and packages of pencils for those kiddos that like to stand at the automatic pencil sharpener.  Well I hate when they come in plastic packaging.  So I comebine them all into one specific spot and my students know they can get one out at anytime.  Also in this drawer I put a bucket of erasers for them to use when they wear their pink little eraser out.  I also do the same thing with pens and highlighters.  The bottom drawer contains flash cards that I have accumulated throughout the past 4 years.  And of course its all labeled!!!! Would you expect anything less??
 

Here is one I made for myself that goes on top of the white drawers.  It's for those awesome smelly markers that all the kids love (they are on top), magnets and labels,  stickers for our charts and tickets for good behavior and just being awesome in general!


Because I don't have many resource books to use I have 3 different filing cabinets full of reproducible books to use for my kiddos.  Of course those are labeled and organized too according to subject on the outside.  Once you pull out the drawer it is organized by concepts. 


I also have a bookshelf that is full of those printables I get off the internet.  They are sorted by subject and inside the binders they are divided into concepts such as time, money, addition, subtractions, etc.


Not only do I do this for myself but I also do it for subs.  If there were ever an emergency and I couldn't be there the substitute could pull items from the cabinent or from the shelf and use them for the class that day.  Hope I'm not boring you all too much and you find some of this helpful! 


Monday, March 19, 2012

Family Planner


Ok so several of you on Instagram have been asking for it. Here it is. If you google family planner or even search for it on Pinterest you get severeal variations of a Family Planner. I made this one to fit our family. I'm sure once Jackson gets older there will be a school tab and a sports tab, but for now its pretty simple. It still isn't finished yet. I want to make a cute cover for it but haven't been able to get to Office Max yet.  Here is where I got my inspirations from.  Iheartorganizing Blog and Blessings By Blog.  Thanks ladies!

Supplies:  Binder and tab pages
The tab pages come with directions on how to go to www.avery.com and download a template for the specific tabs that you bought.  I know! Cool right?!?!

I first sat down and decided which areas would suit my head and myself for organization.  These are the tabs I chose: 
Calendar
Finances
Monthly Menus
Grocery Store List
Coupons

Calendar Tab


I then found a printable calendar online.  I got this one from www.calendarlabs.com.  I then went through and wrote down all the events that are going on from March-December.  Of course I then had to color code them by birthdays, school/work, doctors appointments, holidays, and extra events.

Finances Tab


This printable is almost exactly like iheartorganizing printable but I made it myself to fit our own needs.  

Monthly Menu

I found this monthly menu printable off Pinterest and loved it!  Here it is-- Menu Printable
I also printed one out and put it in a picture frame and sat it by my stove.  At the beginning of each month I plan out my menu in my planner and then transfer it to the real deal that sits in the kitchen.  I write on it with a Versa-pen.  The type of pen they use on overhead projectors. 


Grocery List
Here is where I make my monthly grocery list.  I made this printable myself and can be found here.  Feel free to print it off. 


Coupons
I then made a section for coupons.  I made up my own tabs with sections such as baby, health and hygiene, frozen foods, refrigerated foods, pantry foods, supplies, etc. 

Wednesday, March 14, 2012

Grocery List Printable

As everyone knows I have self diagnosed myself as OCD.  I'm putting together a family binder with finances, coupons, grocery lists, bills lists, calendars etc. in it.  Here is the first item that I have created for our family binder.  It is nothing fancy but it works for us.  We usually go to Aldi or Walmart to get our groceries and this printable makes sorting the items a lot easier!  Hope some of you are able to use it! :)  Enjoy!! 

Ashley Eftink--http://eftinkblessings.blogspot.com/  You have inspired me!!!


Click here to print out your own copy of the grocery store list

Sunday, March 11, 2012

Date Night-March 2012

So for Christmas this year from DJ's sister and brother in law, they gave us a gift card for Yacovelli's in St. Louis and a free night of babysitting.  Boy did we need it!  We hadn't been on a real date together since before Jackson was born.  I know, sad right? We have decided we are going to start doing this at least once a month without Jackson.  I do feel bad not taking him but everyone once in a while we need to be able to eat in peace by ourselves and not have to rush through our meal.  It was nice to just get out, just me and DJ.  It felt like our first date all over again.  After dinner we were going to come home but we thought, heck we have a free babysitter why not go do something instead of running straight home.  So where do we go?!?  The mall of course! 

Our gift card included 2 appetizers, 2 entries, 1 dessert and 2 drinks.  Please keep in my I don't drink much or all that often because it doesn't take much for me!! 

I had never paired heels with skinny jeans before so this was an experiment.  Didn't turn out too bad. 

Yes I bought flip flops at the mall to walk around in because my feet were killing me!!
Much needed!!!
I can't wait till our next date night!!!

Wednesday, March 7, 2012

3 Envelope Crock Pot Sliders

I was very adament about making these 3 Envelope Crock Pot Sliders.  The ingredients did not look good together.  I think it was the salsa that was throwing me off.  I found this recipe on Pinterest. 


Slow Cooker Three Envelope Pot Roast Sliders Recipe:
(Recipe adapted from Plain Chicken)

Roast:
1 3-4 lb beef roast
1 cup water
1 cup salsa
1 envelope onion soup mix
1 envelope Italian dressing mix
1 envelope Au Jus mix

Whisk together water, salsa and seasoning packets. Place roast in slow cooker. Pour seasoning mixture over roast. Cook on low for 8-10 hours, or high for 4-5 hours.

If you want to make sliders:
Three Envelope Pot Roast recipe (above), shredded
1 pkg. King's Hawaiian Rolls
Sliced Swiss cheese (1 slice per slider)     * My hsuband used Horseradish Cheese (Yuck)
Creamy Chipotle Sauce (recipe below)

I did not do this next part!
Cut each roll in half and place on a baking sheet. Place a slice of Swiss cheese on the bottom half of each roll. Place baking sheet in oven with broiler on low. Broil for 1-2 minutes or until edges of the rolls are golden and cheese has melted (be sure to watch them closely so they don't burn!). Remove baking sheet from oven.
I was putting fries in the oven so didn't want to use the broiler. Instead I buttered both sides of the Kings Hawaiian Rolls.  I then placed them on the griddle to brown.  While doing this I pulled the beef out of Crock Pot and shredded it in a seperate bowl.  I then put it back in the Crock Pot to soak up some of the juices.  Had I known I was going to put the meat back in I would have just shredded the meat in the Crock Pot. 

Place a spoonful of shredded beef on top of each roll with Swiss cheese on it.  I then melted it in the microwave since I didn't use the broiler.  Spread Creamy Chipotle sauce on the top half of each roll. Assemble each slider by placing the top half of the roll on top of the bottom.

Creamy Chipotle Sauce:
1/4 cup sour cream (I used fat free)
2 Tbsp chili sauce
2 tsp creamy horseradish sauce (I used Kraft)

Tuesday, March 6, 2012

Jackson's 1st Birthday

Jackson's 1st Birthday Party

Our little monster turned 1 last month.  We decided to do a monster theme because we have always called him our little monster.  This party was so much fun to do and I can't wait to do more!  I hope you enjoy these pictures and maybe even get some ideas of your own!

Happy Birthday Banner from Shelley's Paper Studio on Etsy  http://www.etsy.com/shop/shelleyspaperstudio?ref=ss_profile

So I waited till the last minutes and decided I wanted suckers for Jackson's party. There was no way I was going to pay $15 rush order from Oriental Trading for $5 suckers so I decided to make my own.  You need tissue paper, googly eyes, and hot glue. Oh and suckers of choice.  We used Blow Pops.  Cover tissue paper over sucker.  Cut bottom so it doesn't look like those ghost suckers you make at Halloween.  I used tape to tape the tissue paper to sucker stick.  Hot glue googly eye and make a face with a marker.  Super easy!

My momma made these.  Spray paint shoe box.  Cover in colored tissue paper.  We made the teeth out of white foam board.  I then made the eyes out of cardstock paper and googly eyes.

Jackson's Smash Cake- Diane's Cakery- www.dianescakery.com
1st year pictures taken by Emily Miller Photography- www.emilymphotography.com

Table directions were made from scrubby things from Deals and Dollar Tree.  I think people use them to clean or clean cars.  Cut a hole in bottom.  Put a can in them and hot glued some googly eyes.  A lot of our decorations came from Dollar Tree.


Made this guy out of tissue paper and cardstock.  Found it off of Pinterest.  Here is the tutorial.  http://littlebirdiesecrets.blogspot.com/2010/07/tissue-flower-puff-tutorial-this-video.html


Water Bottle Labels from Shelleys Paper Studio off Etsy. 
 http://www.etsy.com/shop/shelleyspaperstudio?ref=ss_profile
Food tent cards from Shelley's Paper Studio off Etsy.
http://www.etsy.com/shop/shelleyspaperstudio?ref=ss_profile


Deli Sandwhich from Walmart.  Hot glued googly eyes on toothpick and stuck in sandwhich.  Super Cute!


Monday, March 5, 2012

Jackson's first lemon


I just absolutely love this video! This is Jackson's first time having a lemon. He loved it so much he kept going back for more!

Sunday, March 4, 2012

Crock Pot Chicken Pot Pie

I absolutely love to use my slow cooker-crock pot whatever you want to call it.  I love the feeling that when you come home from work your food is already done.  Or like today I put our dinner in there this morning and was able to have our lazy Sunday with my sick baby boy.  Today/tonight I made Chicken and Dumplings.  Well that's what the recipe was called but I think of it more as a Slow Cooker Chicken Pot Pie. 

Ingredients:  5 frozen boneless skinless chicken breasts cut into chunks
                     2 cans cream of chicken soup
                     1 can diced potatoes
                     1 bag frozen veggies(used Birds Eye brand-carrots, peas, green beans, & corn mixtures)
                     2 slices Velveeta-who knows if 2 slices even adds any flavor but that's how I made it :)
                     A little Season All
                     2 tbsp butter
                     2 cans cheap biscuits

Directions:  Put the first 7 ingredients in the crock pot.  I also add a can of water to make sure the chicken mixture is covered.  Cook on low 5-7 hours. 
Just put all ingredients into Crock Pot.


30 minutes before serving, tear apart raw biscuits and place on top of chicken mixture.  Place lid back on and cook until biscuits are done.  They will still have sort of a soggy look to them but they are finished.  Sometimes I even poke my finger in the middle of one to make sure its done. :) 
Biscuits torn apart on top--have not cooked them yet.
Finished product!
The husband isn't a fan of soggy biscuits so I also cook him some extra biscuits in the oven for him to eat with this delicious meal.

This recipe is so good, quick and easy!  My whole family loves it.

This is Me!

Welcome!  I am new to this and have been inspired by many of my Instagramers to start blogging.  Not really for sure what this blog is going to be about.  Maybe just our everyday lives.  Food, events in our lives, vacations, something I find interesting, my OCD-ness, etc.  That is why I have called it This and That.  I will be graduating from Grad school in May and need to find something to do with my extra time.  I have also contemplated possibly starting a printables store on Etsy where I sell different printables such as invitations, banners, food tents, organizational printables, etc.  Just as a hobby.  I have always loved designing invitations and graphic design.  So we will see where that takes me. 


So this is me.  My name is Megan and I live with my husband and son in Missouri.  I will be speaking of them a lot.  I am a Special Education teacher for grades 3-5 but would love to be a Special Education Director.  I will be graduating with my Masters in Elementary Administration and Special Education Director in May.  Hallelujah!

Christmas 2011

LinkWithin

Related Posts Plugin for WordPress, Blogger...